> ## Documentation Index
> Fetch the complete documentation index at: https://docs.tela.com/llms.txt
> Use this file to discover all available pages before exploring further.
# Creating your first Agent
## What is an Agent
An **Agent** is an autonomous AI worker. Instead of a single Prompt, you give it a purpose, the inputs it receives, the outputs you expect, and the tools it can use. The Agent then reasons, uses those tools and completes the task on its own.
Use an Agent when you can't lay out the steps in advance: the path depends on what the Agent finds along the way, it needs to call external services, or it works through a back-and-forth conversation. For a single well-defined instruction, a [Canvas](/en/creating-your-first-canvas) is simpler. If you can draw the steps in advance, a [Workflow](/en/creating-your-first-workflow) is more predictable and easier to test, and it can still use an Agent for one of its steps.
Agent creation is enabled per Workspace. If you don't see the **Agent** option on your Dashboard, contact your Tela team.
## Creating an Agent
Unlike Canvases and Workflows, Agents are created directly inside a Project, so they don't go through the Draft step. From your **Dashboard**:
1. Click **Agent**
2. Give it a name (or keep *Untitled Agent*) and pick the Project it belongs to under **Add to project**
3. Choose a starting point: **Blank agent** to start from scratch, or one of your Workspace's Templates
4. Click **Create**
You can also create an Agent from a Project's page through the **Create** button.
## Understanding the Agent page
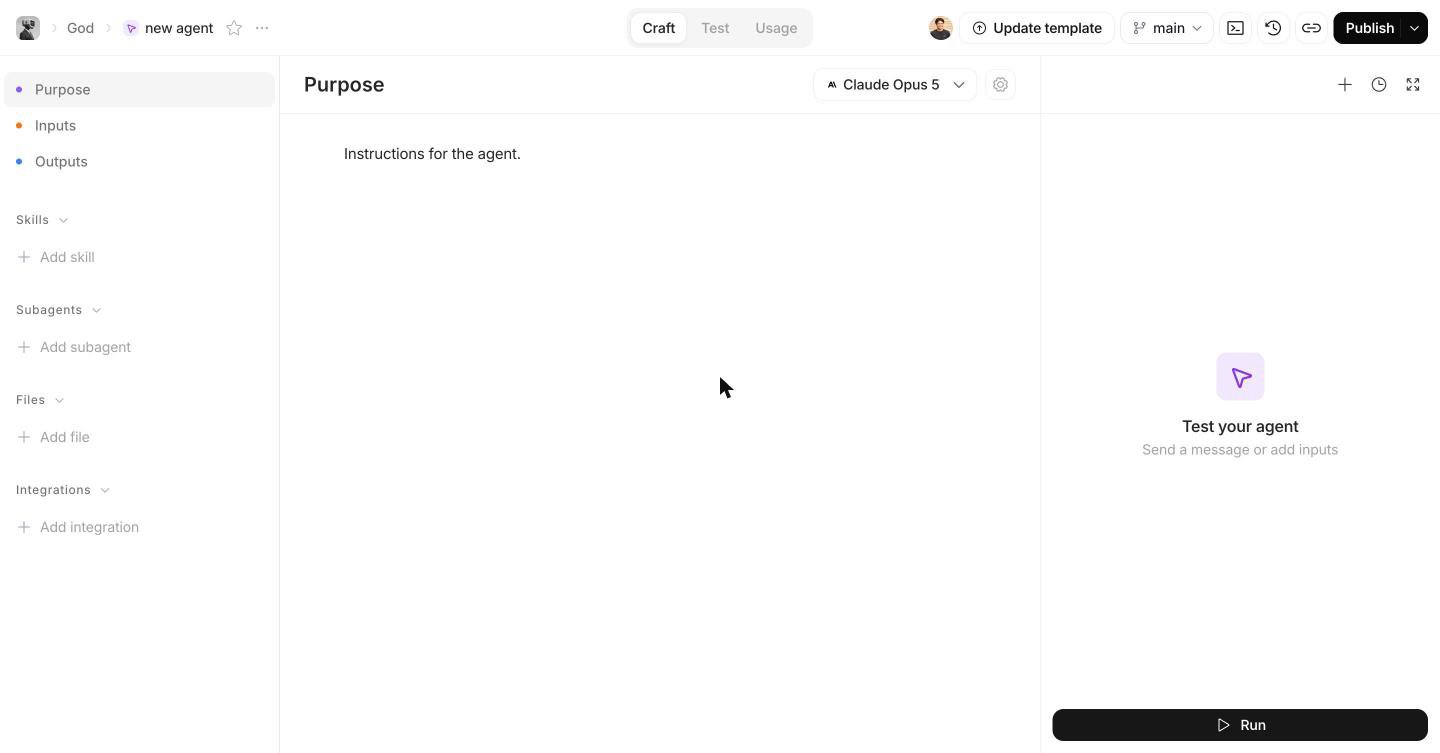
Like a Canvas, an Agent has **Craft**, **Test** and **Usage** experiences in the top center. The **Craft** experience is organized in sections on the left sidebar:
* **Purpose**: the instructions that describe what the Agent does and how it should behave. This is also where you pick the model
* **Inputs**: the variables the Agent receives on each run, as text or files
* **Outputs**: the structured output you expect back, if any
* **Skills**: specialized capabilities you add for complex or recurring tasks
* **Subagents**: helper Agents that your Agent can delegate parts of the work to
* **Files**: reference documents the Agent can consult while working
* **Integrations**: external services the Agent can call without ever seeing their [credentials](/en/credentials)
 Start with **Purpose** and **Inputs** only. Add Skills, Subagents and Integrations once the basic run works the way you expect.
## Running your Agent
Fill in the Inputs on the right-hand panel and click **Run**. You can follow the Agent's progress step by step and inspect the result in the **Preview** and **Debug** tabs.
If you want the Agent to work through a conversation instead of a one-shot run, turn on **Chat** in the Inputs header. The run button becomes a chat box, and the Agent keeps the context between messages.
## Testing and publishing
When a run looks good, click **Review** to save it as a test case, or go to the **Test** experience and click **Create first test**. Each test has inputs, an expected output and optional instructions for the evaluator that judges the result.
When you are ready, click **Publish**. Publishing creates a stable version that your integrations use. Your team can also use the published Agent through an [App](/en/workstation/creating-apps). To call the Agent from your own systems, open the `…` menu and choose **Connect via API**.
This documentation is built and hosted on [Mintlify](https://mintlify.com), a developer documentation platform.
Start with **Purpose** and **Inputs** only. Add Skills, Subagents and Integrations once the basic run works the way you expect.
## Running your Agent
Fill in the Inputs on the right-hand panel and click **Run**. You can follow the Agent's progress step by step and inspect the result in the **Preview** and **Debug** tabs.
If you want the Agent to work through a conversation instead of a one-shot run, turn on **Chat** in the Inputs header. The run button becomes a chat box, and the Agent keeps the context between messages.
## Testing and publishing
When a run looks good, click **Review** to save it as a test case, or go to the **Test** experience and click **Create first test**. Each test has inputs, an expected output and optional instructions for the evaluator that judges the result.
When you are ready, click **Publish**. Publishing creates a stable version that your integrations use. Your team can also use the published Agent through an [App](/en/workstation/creating-apps). To call the Agent from your own systems, open the `…` menu and choose **Connect via API**.
This documentation is built and hosted on [Mintlify](https://mintlify.com), a developer documentation platform.