> ## Documentation Index
> Fetch the complete documentation index at: https://docs.tela.com/llms.txt
> Use this file to discover all available pages before exploring further.
# Creating your first Workflow
## Starting from a Draft
A **Workflow** chains multiple steps into one automated process: extract data from a document, then route it based on a condition, then generate a report. Like a Canvas, every new Workflow starts as a **Draft**, private to you and outside any Project, so you can experiment before sharing it with your team.
Use a Workflow when a single Canvas is not enough: when there are multiple stages, conditions, or different documents involved, and you can describe the steps in advance. If you can't, see [Agents](/en/creating-your-first-agent).
Workflows are enabled per Workspace. If you don't see the **Workflow** option on your Dashboard, contact your Tela team.
## Creating a Workflow
From your **Dashboard**, following the next steps will create your first Workflow:
1. Click **Workflow**
2. You are redirected straight to the new Draft, created as *Untitled Workflow*
3. Click the title at the top of the page to rename it
You can also create a Workflow inside a Project's page through the **Create** button, which skips the Draft step.
## Understanding the Workflow page
The Workflow page has the same **Craft**, **Test** and **Usage** experiences as a Canvas. In **Craft**, the left side is where you assemble the steps and the right side is where you define the Inputs and run the Workflow.
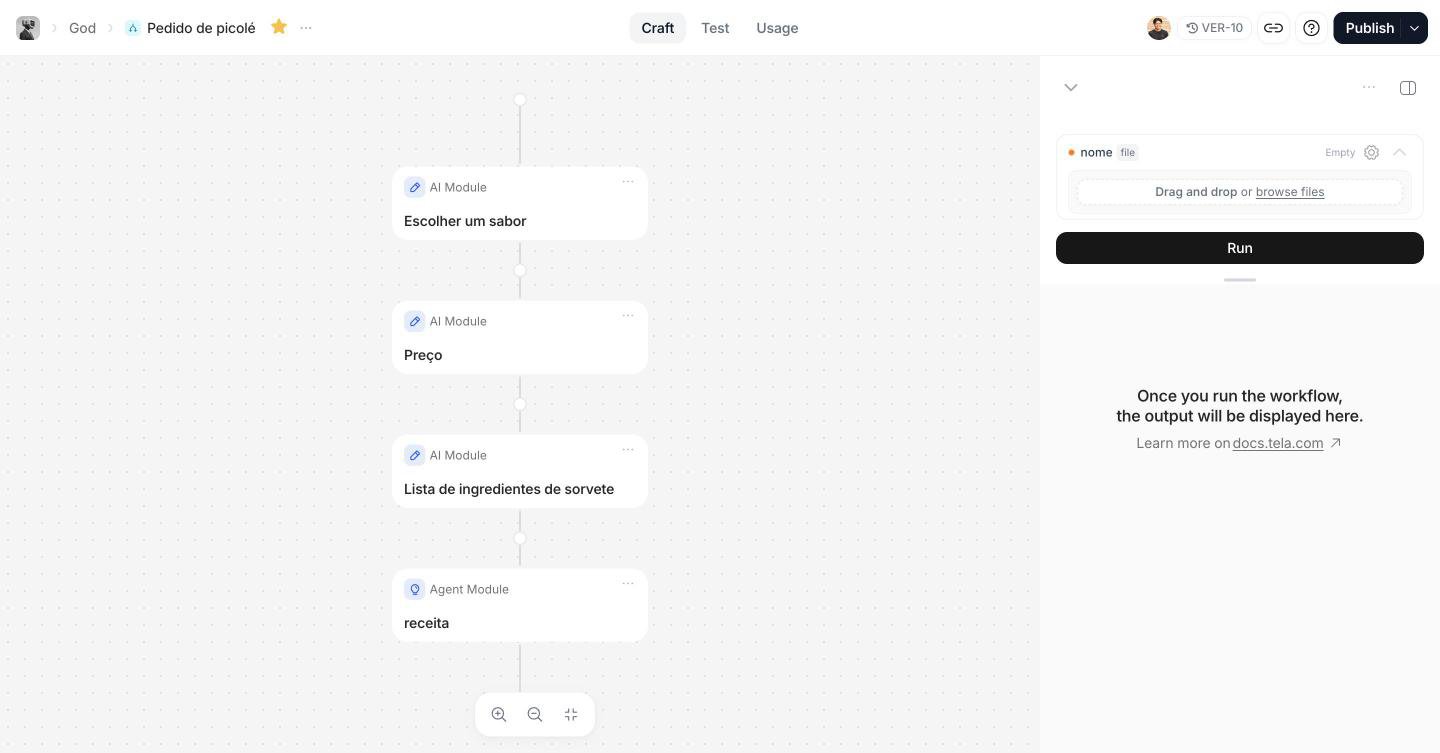 A new Workflow starts empty, with the module picker already open. Each module is one step:
* **AI Module**: write a prompt and structure its output, just like a Canvas
* **Existing Canvas** and **Existing Agent**: reuse something you already built in your Workspace
* **Condition**: define routes so the Workflow follows different paths depending on the data
* **Code Execution**: run custom code on the data between steps
* **Split**, **Crop** and **Map**: break documents or lists into pieces and process each one
* **Document Templater**: generate a document from a `.docx` template (see [How to build .docx templates](/en/how-to-build-docx-templates))
A new Workflow starts empty, with the module picker already open. Each module is one step:
* **AI Module**: write a prompt and structure its output, just like a Canvas
* **Existing Canvas** and **Existing Agent**: reuse something you already built in your Workspace
* **Condition**: define routes so the Workflow follows different paths depending on the data
* **Code Execution**: run custom code on the data between steps
* **Split**, **Crop** and **Map**: break documents or lists into pieces and process each one
* **Document Templater**: generate a document from a `.docx` template (see [How to build .docx templates](/en/how-to-build-docx-templates))
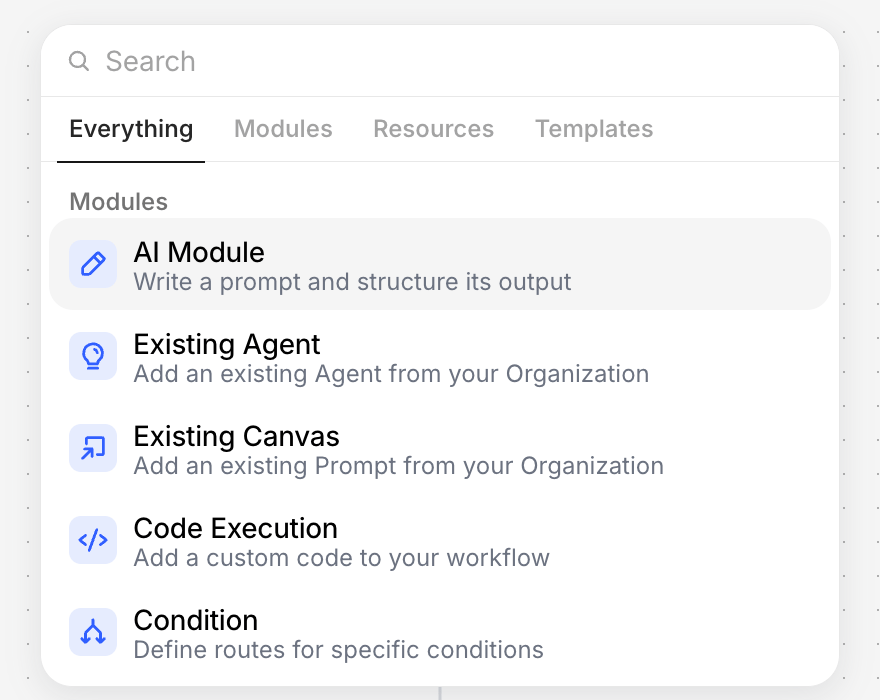 The modules available in the picker depend on what is enabled for your Workspace.
## Building your Workflow
1. Pick your first module from the picker and configure it. New steps are created as *Untitled Step*, so give each one a name
2. Hover the connector below a step and click **+** to add the next one. Steps run in the order you add them
3. In the right-hand panel, click **Add Variable** to define the Inputs your Workflow receives, such as a file or a text
4. Inside a step, type `@` to reference an Input or the output of a previous step
Start with two steps and a single Input. Once that runs end to end, add Conditions and more modules.
## Running, testing and publishing
Fill in the Inputs and click **Run**. The result appears in the **Preview** tab, and **Debug** shows what each step produced. You can also select a single step and run only that step.
The **Test** experience works [like a Canvas](/en/creating-your-first-canvas#running-and-testing-your-canvas): save inputs as test cases and run them all again after every change.
When the Workflow is ready, click **Publish**. Publishing is only available once every step is complete. For a Draft, clicking Publish first asks you to **Move to project**, and the Workflow then becomes visible to your team.
Once published, your team can use the Workflow through an [App](/en/workstation/creating-apps): turn on **Deploy App** in the publish dialog. You can also run it from your own systems by [connecting it via the API](/en/completion-api-guide), the same way as a Canvas, and follow each run step by step with the [Workflow Run API](/api-reference/workflow-run/get-workflow-runs).
This documentation is built and hosted on [Mintlify](https://mintlify.com), a developer documentation platform.
The modules available in the picker depend on what is enabled for your Workspace.
## Building your Workflow
1. Pick your first module from the picker and configure it. New steps are created as *Untitled Step*, so give each one a name
2. Hover the connector below a step and click **+** to add the next one. Steps run in the order you add them
3. In the right-hand panel, click **Add Variable** to define the Inputs your Workflow receives, such as a file or a text
4. Inside a step, type `@` to reference an Input or the output of a previous step
Start with two steps and a single Input. Once that runs end to end, add Conditions and more modules.
## Running, testing and publishing
Fill in the Inputs and click **Run**. The result appears in the **Preview** tab, and **Debug** shows what each step produced. You can also select a single step and run only that step.
The **Test** experience works [like a Canvas](/en/creating-your-first-canvas#running-and-testing-your-canvas): save inputs as test cases and run them all again after every change.
When the Workflow is ready, click **Publish**. Publishing is only available once every step is complete. For a Draft, clicking Publish first asks you to **Move to project**, and the Workflow then becomes visible to your team.
Once published, your team can use the Workflow through an [App](/en/workstation/creating-apps): turn on **Deploy App** in the publish dialog. You can also run it from your own systems by [connecting it via the API](/en/completion-api-guide), the same way as a Canvas, and follow each run step by step with the [Workflow Run API](/api-reference/workflow-run/get-workflow-runs).
This documentation is built and hosted on [Mintlify](https://mintlify.com), a developer documentation platform.